How to Choose the Right Decorative Concrete Contractor
  • /
  • /

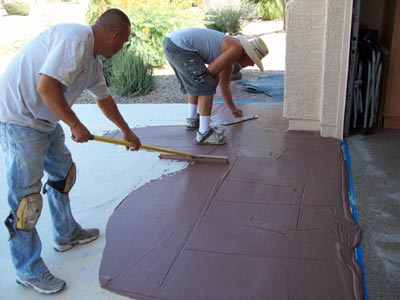
As decorative concrete becomes more popular and decorative concrete products become more innovative, an increasing number of concrete contractors have come onto the scene hoping to capitalize on this trend. Unfortunately, not all of them have the skills and experience to produce the attractive, high performance surfaces that you want.

So, how do you find the contractor that is right for your job?

Do Your Research

Instead of calling the first contractor you find, or simply responding to advertisements, take some time to research your local providers. Today, most companies will have some type of web presence, whether they have a company website or if they are listed in directories or on review websites.

Within these places, you can find out things such as how long the contractor has been in business and which local concrete products and services they provide. If you cannot find any information about the company, this can be a sign of lack of experience.

Licenses, Certifications, & Other Qualifications

Not all states require special licenses or certifications for decorative concrete contractors. However, even in states that do not, some contractors will opt to receive training using certain decorative concrete materials and performing different applications.

Reputations Are Important

Even the worst contractors can afford top-of-the-line advertising. You have to look behind the flashy slogans and get to know the body of work behind the company. Read reviews and ask for references to get a feel for the concrete contractor’s reputation in the area. Ask previous customers if they would be willing to work with the contractor again.

Can They Provide What YOU Want?

With all of the different concrete dyes, concrete stains, stamped concrete mats, and specialty concrete mixes available today, decorative concrete projects can differ significantly from one another. Instead of simply asking how many years of experience a contractor has, find out how many projects they have completed that are similar to what you want.

Will They Listen? 

Creating a decorative concrete floor can be a very artistic process, especially if you want to incorporate original designs using epoxy concrete coatings and other innovative supplies. You likely have a very specific vision regarding how the finished product should look.

It is important to work with a contractor who will seriously listen to you and your ideas. Do not be afraid to ask plenty of questions regarding the decorative concrete materials and how they are used. The contractor you choose should make you feel comfortable during this collaborative process.

Continue reading...
How to Enhance Outdoor Spaces with Decorative Concrete Countertops
  • /
  • /

Homeowners are always looking for interesting ways to improve their outdoor living spaces. This might include installing a fire pit, an outdoor kitchen, or a pool deck with a bar. All of these spaces can be further enhanced with the help of concrete countertop supplies and a high quality concrete sealer.

Enjoy Versatility with Decorative Concrete Supplies

By choosing to use concrete countertop products, homeowners have the freedom to create nearly any look for their countertops. The slabs can be created using specialty concrete mixes that contain the colors and aggregates that are desired. Rubber concrete stamps can even be used to make it look as if the counter is covered in tile or made from pieces of natural stone.

As HGTV Remodels explains, concrete countertop supplies offer a virtually infinite range of options. Using concrete dyes or the perfect concrete stain, it is possible to achieve nearly any color and any pattern. An acid stain can be used to transform the entire countertop or create a splash or speckled effect. Concrete counters can also be designed with custom features, like draining or cutting boards, and can be tailored to accommodate custom sinks.

Precautions to Take When Using Concrete Countertops Outdoors

When you are using decorative concrete supplies for your outdoor kitchen, your fire pit, or any other exterior area, you need these materials to be able to weather the elements. Concrete can potentially crack or become stained if it is not installed and sealed properly. To combat these problems, contractors can reinforce the countertops using tensile steel or spiderlathe within the structure, and apply protective concrete sealers.

Non-toxic concrete sealers are ideal for safeguarding interior and exterior concrete countertops. These sealants are safe for people to use, and they stop the concrete from being porous. The porosity of concrete is what can make these countertops vulnerable, as the concrete absorbs moisture. By using concrete countertop products like low VOC sealers, a barrier can be created that stops moisture from seeping in.

Finding a Reliable Contractor

Installing any countertop can be a major undertaking, and there are plenty of opportunities for mistakes to occur. This is especially the case when those countertops need to perform outdoors. To receive the best results possible, it is sometimes wise to choose a contractor who is familiar with working with decorative concrete countertop supplies. Ask for references and examples of previous work to find the contractor who can best fill your needs.

Continue reading...
How to use a Tools Border Roller
  • /
  • /

Perfect decorative tool to set your work apart from the competition.  Borders can add color, texture and dimension to many types of concrete surfaces.  Some common uses are to jazz up an otherwise un-inspiring plain gray slab, provide a more decoratve aspect to control joints or pour breaks or put the final touch on a stamped masterpiece.  Stamped borders really set your work off and tools stamped border rollers make a tough job far easier. Here is an overview of using a border roller. walttools border roller

Form pour and place concrete as normal. Bull float and edge normally. If control joints
are being placed with groover, do so as normal.
Timing is everything Rollers are used earlier than stamping. You should be able to
press your thumb into the surface far easier than the standard for stamping(anywhere
from 15 min to 45 min). The ideal time is when the surface cream allows the roller to
partially settle into the surface allowing a clean impression. If when you begin to roll
and the roller “slides/skids” instead of rolling, it is too soon. If the grout lines
“support” the roller on the surface,it is too hard and you will need to lean much more
on the roller making steady a impression more difficult.
If using a release agent(powder or liquid) of a different color than the rest of the job care should be taken to carefully place release in the border path. One simple method is to cut a heavy napped paint roller cover(or sponge for liquid) to the same width as your  stamping roller, coat with release and roll the release along the intended border path. If using the same color release as the remaining job you can apply your release with less discretion. Tru Impressions border rollers have either one or two grout edges depending on the design. Either works for borders. If using a single edge roller, the plain edge is to be placed on the outside along the form where it should have been previously edged thus giving you the second grout line.

With one hand on the bull float handle and the other on the outer edge of the bracket, carefully begin to roll the impression. A slow steady walking pace keeping a slight but steady pressure on the roller, keeping it aligned along the outer form will produce the best results. When encountering a curve, move the outer hand to the roller itself to aid in manually “rolling/turning” the roller. This method will allow the tool to shape the stones or bricks into the corresponding shapes as though they were cut for the curve. If doing a double row, the same process is followed with the exception of having no form support as a guide. Added rows are recommended only by using a second roller as timing can become critical as the surface hardens. After rolling the border, if the remaining surface is to be stamped certain precautions should be taken to avoid damaging the completed border. Most typically, when working around the border, you will protect your border with a similar texture seamless skin. Carefully place the skin on the border surface under the potential striking area of the floppy. If needed you can gently rest the floppy over the skin, preventing any grout lines or other surface marring as you complete the impression with that mat. Care must be taken not to tamp the stamp on the actual border. Continue this method as you complete the edges of the main stamped surface.
When doing longer runs with the border roller that are not along the edge as would be the
case of masking a control joint, you will need to use an appropriate length handle. With
a steady hand carefully roll the roller along the groove with the non-grout edge on the
groove if that is the roller design.  When possible using a long straight-edge as an edge
guide is recommended for steadiness. If a metal straight edge is not available making
an “L” brace with 2x4s will work and resist curving. Long internal runs like this need to
be done before any outer borders due to the inability to provide as much downward
pressure on the border roller.

8in-window-well.jpg
Optional matching floppy mats are also very useful when working into sharp corners
and up against a vertical obstruction. Touch ups and small corrections are usually com-
pleted with a grout tool and/or touch-up mat.
As with any new decorative concrete tool, it is highly recommended to use on a test slab for practice with various techniques before an actual project. Questions on technical information and roller uses, call 888 263 5895.

Continue reading...